Git Tutorial: Complete Guide to Version Control for Beginners
Master Git with our comprehensive, step-by-step tutorial. Learn essential commands, branching strategies, and collaboration workflows used by professional developers worldwide.
Git Installation & Setup
Get started with Git by downloading and installing it on your operating system. Choose your platform below:
Create a New Git Repository
Start your version control journey by creating a new Git repository. Navigate to your project directory and initialize Git:
git init
This command creates a new Git repository in your current directory, setting up the necessary files for version control.
Clone an Existing Repository
To work with an existing Git repository, you can create a local copy using the clone command:
Clone from local path:
git clone /path/to/repository
Clone from remote server:
git clone username@host:/path/to/repository
Clone from GitHub/GitLab:
git clone https://github.com/username/repository.git
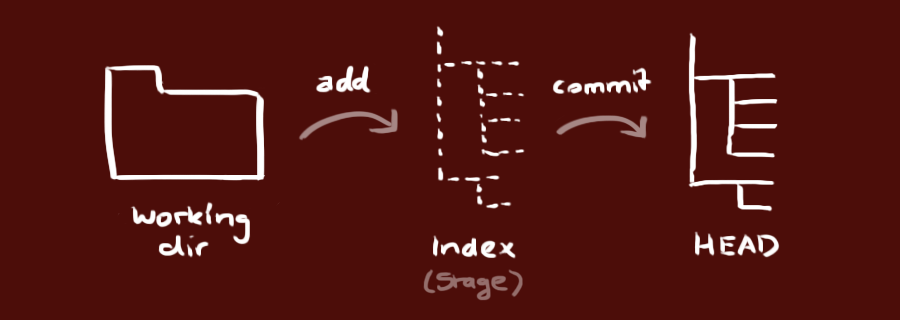
Understanding Git Workflow
Git uses a three-tree architecture to manage your code changes effectively:
- Working Directory: Contains your actual project files
- Staging Area (Index): Temporary area for changes ready to commit
- HEAD: Points to your last commit in the current branch
Stage and Commit Changes
Learn the fundamental Git workflow for tracking and saving your code changes:
Staging Changes
Add files to the staging area (Index) before committing:
git add <filename>
Stage a specific file
git add .
Stage all changes in current directory
git add *
Stage all files (excluding hidden files)
Committing Changes
Save your staged changes to the Git history:
git commit -m "Your descriptive commit message"
Pro tip: Write clear, descriptive commit messages that explain what and why you changed something.
Push Changes to Remote Repository
Share your committed changes with others by pushing to a remote repository:
Push to Remote Branch
git push origin main
Replace main with your target branch name. Modern repositories use 'main' instead of 'master' as the default branch.
Connect to Remote Repository
If you haven't connected your local repository to a remote server yet:
git remote add origin <repository-url>
After adding the remote, you can push your changes to share them with your team.
💡 Pro Tips:
-
Always pull latest changes before pushing:
git pull origin main -
Use descriptive branch names for features:
feature/user-authentication - Push frequently to avoid losing work and enable collaboration
Git Branching Strategy
Branches enable parallel development and feature isolation. The main branch represents your production-ready code, while feature branches allow safe experimentation.

Essential Branching Commands
git checkout -b feature/new-feature
Create and switch to a new branch
git branch
List all local branches
git checkout main
Switch back to main branch
git branch -d feature/new-feature
Delete a branch (safe delete)
git push origin feature/new-feature
Push branch to remote repository
🏆 Branching Best Practices:
-
Use descriptive branch names:
feature/user-login,bugfix/header-styling - Keep branches focused on single features or fixes
- Regularly sync with main branch to avoid conflicts
- Delete merged branches to keep repository clean
Update and Merge Branches
Keep your code synchronized and integrate changes from different branches:
Updating Your Local Repository
git pull
Downloads and merges remote changes into your current branch. This
combines git fetch and git merge.
Merging Branches
git merge <branch-name>
Integrates changes from another branch into your current branch.
Handling Merge Conflicts
When Git can't automatically merge changes, you'll need to resolve conflicts manually:
- Open conflicted files and resolve differences
- Stage resolved files:
git add <filename> - Complete the merge:
git commit
Preview Changes Before Merging
git diff main feature/new-feature
Compare differences between branches before merging to understand what will change.
🔄 Merge Strategy Tips:
- Always test merged code before pushing to main
- Use pull requests/merge requests for code review
- Consider using
git rebasefor cleaner history - Communicate with team before major merges
Git Tagging for Release Management
Tags mark specific points in your Git history, typically used for software releases and version milestones:
Creating Tags
git tag v1.0.0
Create a lightweight tag at current commit
git tag -a v1.0.0 -m "Release version 1.0.0"
Create an annotated tag with message
git tag v1.0.0 1b2e1d63ff
Tag a specific commit using commit hash
Managing Tags
git tag
List all tags
git push origin v1.0.0
Push specific tag to remote
git push origin --tags
Push all tags to remote
Semantic Versioning: Use semantic versioning (MAJOR.MINOR.PATCH) for clear version communication.
Git History and Logging
Explore your project's history and track changes with powerful Git log commands:
Basic Log Commands
git log
Show complete commit history
git log --oneline
Compact one-line format
git log --author="John Doe"
Filter commits by author
git log --since="2 weeks ago"
Show recent commits
Advanced Log Visualization
git log --graph --oneline --decorate --all
ASCII art tree of all branches with decorations
git log --name-status
Show which files changed in each commit
git log --stat
Show file change statistics
For complete documentation: git log --help
Undo Changes and Reset Repository
Learn how to safely undo changes and reset your repository to previous states:
Discard Local File Changes
git checkout -- <filename>
Restores file to last committed state. Warning: This permanently discards unstaged changes.
Discard All Local Changes
git reset --hard HEAD
Resets working directory and staging area to last commit.
Reset to Remote State
git fetch origin
git reset --hard origin/main
Completely sync with remote repository state
Safe Alternatives
git stash
Temporarily save uncommitted changes
git stash pop
Restore stashed changes
git revert <commit-hash>
Create new commit that undoes previous commit
⚠️ Important Safety Tips:
- Always commit or stash important changes before resetting
- Use
git statusto check what will be lost -
Consider
git revertinstead ofgit resetfor shared repositories
Advanced Git Tips and Configuration
Enhance your Git experience with these productivity tips and configuration options:
Git GUI Tools
gitk
Launch built-in graphical repository browser for visual commit history.
Essential Git Configuration
git config --global user.name "Your Name"
git config --global user.email "your.email@example.com"
Set your Git identity for commits
git config --global color.ui auto
Enable colorful Git output for better readability
git config --global core.editor "code --wait"
Set VS Code as default Git editor
git config --global init.defaultBranch main
Set 'main' as default branch name
Productivity Commands
git add -i
Interactive staging for precise change selection
git commit -am "Message"
Stage and commit all tracked files in one command
git status -s
Short status format for quick overview
Useful Aliases
git config --global alias.st status
git config --global alias.co checkout
git config --global alias.br branch
Create shortcuts for common commands
Git Resources and Tools
Expand your Git knowledge with these curated resources and tools:
Recommended Git GUI Clients
- GitX (L) - macOS, open source
- Tower - macOS & Windows, professional Git client
- Sourcetree - macOS & Windows, free by Atlassian
- GitHub Desktop - Cross-platform, free
- GitKraken - Cross-platform Git GUI
Essential Git Learning Resources
- Pro Git Book - Official comprehensive guide
- Learn Git Branching - Interactive visual tutorial
- Think Like a Git - Conceptual understanding
- GitHub Documentation - Platform-specific guides
- Visual Git Guide - Diagram-based learning
- Atlassian Git Tutorials - Comprehensive workflow guides
Advanced Topics to Explore
- Git Workflows: GitFlow, GitHub Flow, GitLab Flow
- Git Hooks: Automate tasks with pre-commit, post-merge hooks
- Git Submodules: Manage dependencies and nested repositories
- Git LFS: Large File Storage for binary assets
- Continuous Integration: Integrate Git with CI/CD pipelines